LAMP:Linux、Apache、MariaDB or MySQL、PHP 的縮寫,是架設網站最基本的組合套件。如果只是純靜態網站的話,只要裝 Apache 就足夠了,不過以 WordPress 為例,它包含了前後端的各種功能,因此全套的 LAMP 還是得用上。有關 Linux 的安裝就不再多說,下面介紹另外三套軟體與 phpMyAdmin 的安裝方法:
安裝 Apache
sudo yum install httpd
設定在開機時自動開啟 Apache
sudo systemctl enable httpd
啟動 Apache
sudo systemctl start httpd
設定防火牆允許外面連入網站
sudo firewall-cmd --permanent --add-service=http
sudo firewall-cmd --permanent --add-service=https
sudo firewall-cmd --reload
安裝 PHP
sudo yum install php php-mysql php-pdo php-gd php-mbstring php-mcrypt
修改 PHP 的時區設定
sudo sed -i 's/;date.timezone =/date.timezone = Asia\/Taipei/' /etc/php.ini
建立測試用 php 檔,用來驗證 php 是否安裝成功
echo '<?php phpinfo(); ?>' | sudo tee /var/www/html/index.php
重新啟動 Apache
sudo systemctl restart httpd
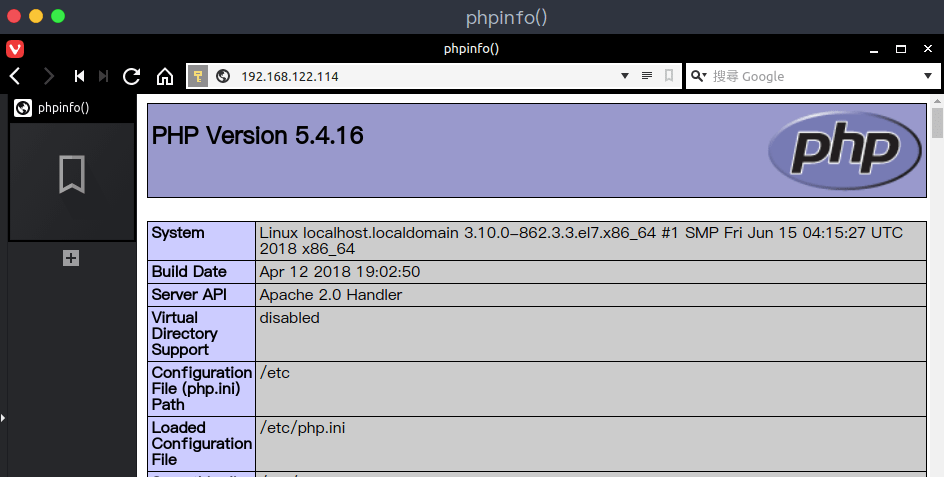
測試 Apache
在瀏覽器的網址列打上 Server 的 IP,如果出現下方頁面表示 Apache 與 PHP 已安裝成功
安裝 MariaDB
sudo yum install mariadb-server mariadb
設定在開機時自動開啟 MariaDB
sudo systemctl enable mariadb
啟動 MariaDB
sudo systemctl start mariadb
初始化 MariaDB 的安全設定(請見文末的補充說明)
sudo /usr/bin/mysql_secure_installation
# 執行結果:

NOTE: RUNNING ALL PARTS OF THIS SCRIPT IS RECOMMENDED FOR ALL MariaDB
      SERVERS IN PRODUCTION USE!  PLEASE READ EACH STEP CAREFULLY!

In order to log into MariaDB to secure it, we'll need the current
password for the root user.  If you've just installed MariaDB, and
you haven't set the root password yet, the password will be blank,
so you should just press enter here.

Enter current password for root (enter for none):
OK, successfully used password, moving on...

Setting the root password ensures that nobody can log into the MariaDB
root user without the proper authorisation.

Set root password? [Y/n] Y
New password:
Re-enter new password:
Password updated successfully!
Reloading privilege tables..
 ... Success!


By default, a MariaDB installation has an anonymous user, allowing anyone
to log into MariaDB without having to have a user account created for
them.  This is intended only for testing, and to make the installation
go a bit smoother.  You should remove them before moving into a
production environment.

Remove anonymous users? [Y/n] Y
 ... Success!

Normally, root should only be allowed to connect from 'localhost'.  This
ensures that someone cannot guess at the root password from the network.

Disallow root login remotely? [Y/n] Y    # 如果之後需要遠端登入 DB 的話,這個選項請選「n」
 ... Success!

By default, MariaDB comes with a database named 'test' that anyone can
access.  This is also intended only for testing, and should be removed
before moving into a production environment.

Remove test database and access to it? [Y/n] Y
 - Dropping test database...
 ... Success!
 - Removing privileges on test database...
 ... Success!

Reloading the privilege tables will ensure that all changes made so far
will take effect immediately.

Reload privilege tables now? [Y/n] Y
 ... Success!

Cleaning up...

All done!  If you've completed all of the above steps, your MariaDB
installation should now be secure.

Thanks for using MariaDB!
設定防火牆允許連入 SQL 資料庫
sudo firewall-cmd --permanent --add-service=mysql
sudo firewall-cmd --reload
安裝 phpMyAdmin
sudo yum install epel-release
sudo yum install phpmyadmin
修改 phpMyAdmin 的設定
在預設情況下,CentOS 7 上的 phpMyAdmin 只允許從本機 (127.0.0.1) 連進去。為了能遠端連線,需要改變它的設定。
sudo vim /etc/httpd/conf.d/phpMyAdmin.conf
# phpMyAdmin - Web based MySQL browser written in php
#
# Allows only localhost by default
#
# But allowing phpMyAdmin to anyone other than localhost should be considered
# dangerous unless properly secured by SSL

Alias /phpMyAdmin /usr/share/phpMyAdmin
Alias /phpmyadmin /usr/share/phpMyAdmin

<Directory /usr/share/phpMyAdmin/>
   AddDefaultCharset UTF-8

   <IfModule mod_authz_core.c>
     # Apache 2.4
     <RequireAny>
       Require ip 127.0.0.1
       Require ip ::1
       Require ip XX.XX.XX.XX  ← 在這裡新增允許連入的IP
     </RequireAny>
   </IfModule>
   <IfModule !mod_authz_core.c>
     # Apache 2.2
     Order Deny,Allow
     Deny from All
     Allow from 127.0.0.1
     Allow from ::1
   </IfModule>
</Directory>

<Directory /usr/share/phpMyAdmin/setup/>
   <IfModule mod_authz_core.c>
     # Apache 2.4
     <RequireAny>
       Require ip 127.0.0.1
       Require ip ::1
       Require ip XX.XX.XX.XX  ← 在這裡新增允許連入的IP
     </RequireAny>
   </IfModule>
   <IfModule !mod_authz_core.c>
     # Apache 2.2
     Order Deny,Allow
     Deny from All
     Allow from 127.0.0.1
     Allow from ::1
   </IfModule>
</Directory>
如果不指定 Require ip,改為「Require all granted」的話,表示所有的主機都能使用你的 phpMyAdmin
重新啟動 Apache Service
sudo systemctl restart httpd
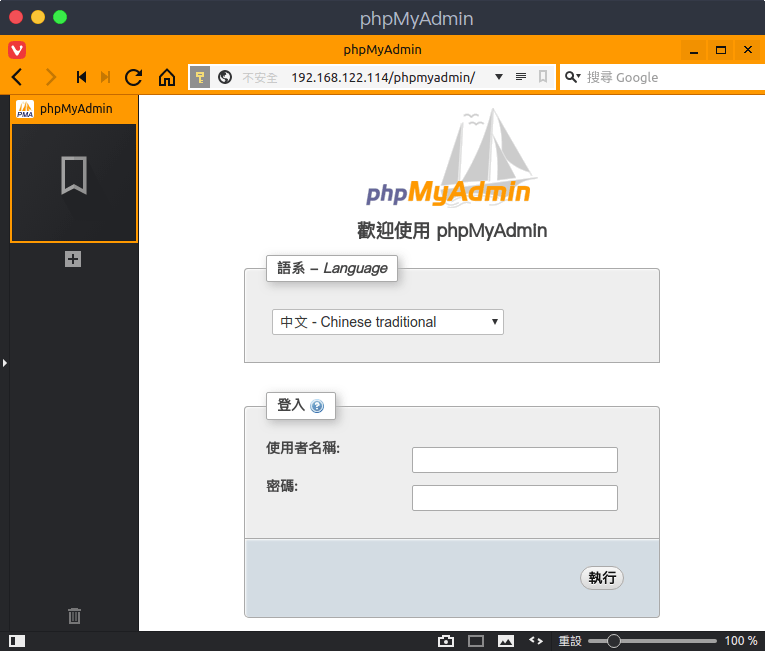
測試安裝是否成功
用瀏覽器鍵入下面位址(記得改成你的 ip 或 domain name ),如果出現同樣的畫面表示設定成功,你可以開始用 phpMyAdmin 來操作 SQL 資料庫了
注意事項:
- 如果當 php 要上傳檔案到資料夾時出現權限問題( SELinux 已設定好),有可能是資料夾權限的關係,用 ps aux | grep httpd 可以查看執行 httpd 的使用者是誰,如果是 apache 的話,上傳的資料夾 owner 得設為 apache 才能上傳成功
- 使用 DB 時必須建一個權限為任意主機的帳號才能遠端連線,預設 root 是無法遠端連線的
- 想要使用 root 權限遠端登入 MariaDB 的話,帳號不能是 root,需建立一個非 root 但有 root 權限的帳號,而且執行 /usr/bin/mysql_secure_installation 時,Disallow root login remotely的選項要選「n」